Youtube Spam Comments Classification project : Multinomial Naive Bayes Classifier
Introduction
In this project we are going to learn on how to classify Youtube comments whether they are Ham or Spam. This comprehensive step by step guide will take you from completely beginner to master the practical implementation of the Naive Bayes Classifier: A Complete Guide to Probabilistic Machine Learning our previous article if you have check on it please do so.
What is Multinomial Naive Bayes Classifier
Multinomial naive Bayes Classifier is one of the text Based Naive bayes classifier algorithm that is suitable for Text classification with balanced dataset. In this article we are going to practical implement the Multinomial Naive Bayes Classifier to classify whether the given YouTube Comment is a Ham or Spam,
Dataset Overview
The database for this example is taken from https://archive.ics.uci.edu/ml/machine-learning-databases/00380/
We usually modify the databases slightly such that they fit the purpose of the course. Therefore, we suggest you use the database provided in the resources in order to obtain the same results as the ones in the lectures.
The dataset contains 5 CSV files in The folder in which we are going to use them for our Training and Testing Purpose
The files are name:
Youtube01.csv
Youtube02.csv
Youtube03.csv
Youtube04.csv
Youtube05.csv

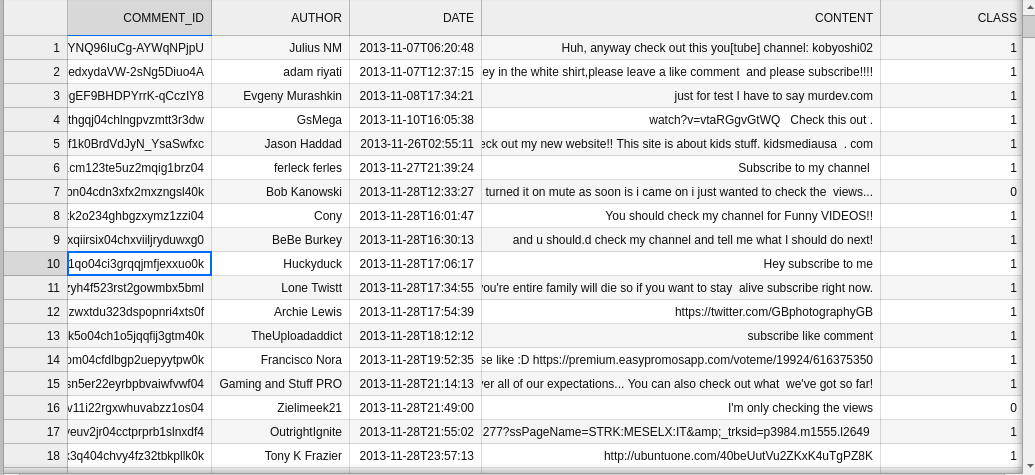
Here is the sneak peak of the dataset overview:
Import the necessary Libraries
To get started with building our classifier , first we need to import all necessary python libraries which we are going to use as follows:
# A module for handling data
import pandas as pd
# A module that helps finding all pathnames that match a certain pattern
import glob

# A class that will be used to count the number of times a word has occurred in a text
from sklearn.feature_extraction.text import CountVectorizer

# A method used to split the dataset into training and testing
from sklearn.model_selection import train_test_split

# The multinomial type of the Naive Bayes classfier
from sklearn.naive_bayes import MultinomialNB, ComplementNB

# Importing different metrics that would allow us to evaluate our model
from sklearn.metrics import classification_report, ConfusionMatrixDisplay

# Python's plotting module.
# We improve the graphics by overriding the default matplotlib styles with those of seaborn
import matplotlib.pyplot as plt
import seaborn as sns

# The Python package for scientific computing
import numpy as npDataset Preprocessing
Here we are going to apply various approaches which they are going to help to prepare our dataset ready to be fit to the model for training and evaluation
Reading the Database(dataset)
let grab all the files in our dataset as a single pandas DataFrame so we can easily work on it, as follows
# Using the 'glob()' method, create a variable of type 'list' called 'files'.
# It stores the paths of all files in the folder 'youtube-dataset' whose extension is .csv.
files = glob.glob('youtube-dataset/*.csv')
filesthe Output looks something like this:

Then, Let join all the dataset into a single pandas DataFrame, we can use a for each loop to loop to all files and read them using pandas, after that add them to the single DataFrame as rows.
NOTE: we omitted the unnecessary columns (features) from the dataset such as ‘COMMENT_ID’, ‘AUTHOR’, ‘DATE’ and many other column to only remain with the import features required. also we dropped the Index to ensure that the new rows added tends to follow the required sequences, the code implementation is as follows:
# An empty array which will be used to store all 5 dataframes corresponding to the 5 .csv files.
all_df = []

# Run a for-loop where the iterator 'i' goes through each filename in the 'files' array.
# During each iteration, create a pandas DataFrame by reading the current .csv file.
# Drop the unneccesary columns (along axis 1) and append the dataframe to the 'all_df' list.
for i in files:
    all_df.append(pd.read_csv(i).drop(['COMMENT_ID', 'AUTHOR', 'DATE'], axis = 1))
# Create a dataframe that combines all pandas dataframes from the 'all_df' list
data = pd.concat(all_df, axis=0, ignore_index=True)
dataHere is the sample outcome for the data:

From this point now we can check for any null values in the dataset. for the case of this dataset there was no any null values, Here is the code implementation:
data.isnull().sum()the output should look something like this one here:

Splitting the Dataset
Remember the train_test_split module we imported from sklearn.model_feature is the one which we are going to split our database into test set and training set. But before that we have to separate the target form the Inputs for easier splitting and working with the model
Separating Inputs from Target
Here we are going to separate our Dataset into Inputs and Target from our previous Pandas data frame. Here is practical code implementation:
inputs,target = data['CONTENT'], data['CLASS']Splitting the dataset into Training and Test Set
In this step we are required to divide our dataset into training and test set. where the training set is used for training the model and the Test set is used to evaluate the model on the unseen data. Here is the practical code implementation:
# spliting the train and test set
x_train,x_test,y_train,y_test = train_test_split(inputs,target,
                                                test_size = 0.2,
                                                stratify = target,
random_state = 101)Tokenizing the Dataset
This is very crucial step since we are dealing with Text data which fall in the natural language processing perspective. Here tokenizing is going to help use create a dictionary of worlds and count there existence in the sentence.
NOTE :
- We only apply the fit_transform to the training dataset(x_train) since this is going to create a dictionary list
- we well be required to use the tokenizer to perform other transformation to the test data set without fitting it and the use it for prediction
#initializzing the vectorizer
vectorizer = CountVectorizer()
x_train_trans = vectorizer.fit_transform(x_train)
# transforming the test set
x_test_trans = vectorizer.transform(x_test)Training the model
This is the most crucial part of the machine learning process, in this step we are going to initialize the classifier and fit it to the training data, where it is going to learn from it and later we can use the model in production or our test set to perform the evaluation
NOTE:
1. .FIT is used to fit the training dataset to the model which in another term is to train the model on the trained data.
Here is the practical code implementation:
#initiaizing the classifier
clf = MultinomialNB(class_prior = np.array([0.6,0.4]))
#training the classifier
clf.fit(x_train_trans, y_train)The output would look like:

NB: in the code above there is an additional parameter that is class_prior = np.array([0.6,0.4]) this was an optimization parameter that was added to the model. in this article am not going to discuss on how we can are going to optimize the model. to learn about that please check on an article on how to optimize a naive bayes classifier model on our site or comment below in the comment section if you want i include it in this article we take those comments and help to modify the code and improve this article to make it more useful.
Evaluating the model perfomance
In this step we are going to make the model evaluation and performance on new unseen data and see if it give out the most reliable results that we can use to make our own production ready system. for this evaluation we are going to use the previous transformed test set.
The code implementation is as follows:
#making prediction on the test set
y_pred = clf.predict(x_test_trans)
#checking the evaluation using the confusion matrix
ConfusionMatrixDisplay.from_predictions(
    y_test,y_pred,
    labels = clf.classes_,
    cmap = 'magma'
)Here is the output:
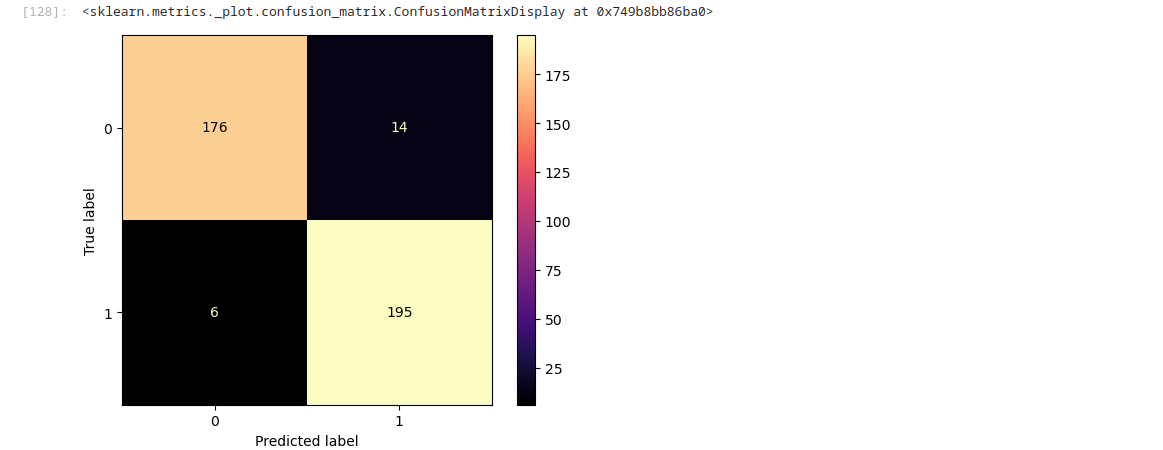
NB: we intentionally did include much information on how to use the confusion Matrix Display in this article but still you can learn on how to use the confusion one of our other article on our site dedicated to the confusion matrix be sure to check out. it adds some values to the to your machine learning skills>
WAIT: In-case you think it is necessary to include it details in this article you can leave you comment below this will help us to get your opinion on how to make this article even better.
Printing the classification report
Using the confusion matrix does not give in-depth understanding of the model performance we need other methods to understand about other metrics which include precision and Accuracy, Recall and F1-score. You can get all those information by printing classification report.
The code implementation of that:
print(classification_report(y_test,y_pred))the output:

For more details on how to use the Classification Report please check a dedicated article on the classification report here on our site
Performing Real world prediction
Final now we are ready to try our model on the new coming comments. here is how you can implement that,
comment = "This is a very good video. Thanks alot"
trans_comment = vectorizer.transform([comment])
clf.predict(trans_comment)What Next ?
well thank you so much for making it till the end. In this article were implemented naive bayes multinomial classifier algorithm step by step . and were able to classify whether the given comment is ham (to mean good) or spam. The learn doesn’t end here we have so many other articles related to machine learning feel free to explore.Naive Bayes Classifier: A Complete Guide to Probabilistic Machine Learning
In-case you have faced any difficult, please make a good use of the comment section i will personal be there to help you when you are stuck. also you can use the FAQs section below to understand more.
We think sharing practical implementation on real world example various machine learning skill is the key point to mastery and also solve various problem that affect our society we are intended to teach you through practical means if you think our idea is good. Please and please leave us a comment below about your views or request an article. as usual don’t forget to up-vote this article and share it.
Frequently Asked Questions (FAQs)
What is the Naive Bayes Classifier?
- A Naive Bayes Classifier is a probabilistic machine learning algorithm based on Bayes’ theorem, used for classification tasks.
How does the Naive Bayes algorithm work?
- It calculates the posterior probability of each class given the input features and selects the class with the highest probability.
What are the assumptions of Naive Bayes?
- The main assumption is that all features are conditionally independent given the class label.
What types of data can Naive Bayes handle?
- It can handle both continuous and discrete data, with variations like Gaussian for continuous and Multinomial for discrete data.
In what applications is Naive Bayes commonly used?
- It is widely used in text classification, spam filtering, sentiment analysis, and recommendation systems.
What are the advantages of using Naive Bayes?
- Advantages include simplicity, speed, efficiency with large datasets, and good performance even with limited training data.
What are the limitations of Naive Bayes?
- Its primary limitation is the assumption of feature independence, which may not hold in real-world scenarios.
How do you evaluate the performance of a Naive Bayes model?
- Performance can be evaluated using metrics such as accuracy, precision, recall, and F1-score.
Can Naive Bayes be used for multi-class classification?
- Yes, Naive Bayes can effectively handle multi-class classification problems.
How do you implement a Naive Bayes Classifier in Python?
You can implement it using libraries like Scikit-learn with functions like `GaussianNB`, `MultinomialNB`, or `BernoulliNB`.
